- For this assignment I had to create a butterfly image with a flower. I had to use layers and the picture had to be original.
- First I started with the background. I made a rectangle and fit it to my canvas. I gave it and inner bevel and its own layer. I did this for the blue background as well. For the yellow background I gave it an inset emboss to make the picture look framed.
- Now onto the flower. I used the polygon tool and adjusted the sides and angles to give a flower shape. Then I moved the handles around to make it not as sharp looking. I did the same steps with the inner flower and grouped it with the pink flower. I gave each flower an inner bevel.
- For the stem I used the pen tool to create points and just connected them to make a stem shape. I make the stem and the flower separate layers. I also gave the stem an inner bevel.
- For my butterfly I only used the circle and swirl tool to make the shapes. I added points and adjusted them to make the wings. To make sure the wings were symmetrical I copied one and went to modify, transform, and flip horizontal. Then I made a bunch of different circles and ovals to make the wings prettier. Then I gave the wings a texture and grouped the butterfly together with Ctrl-G.
- Then I used the text-box tool to add my name.
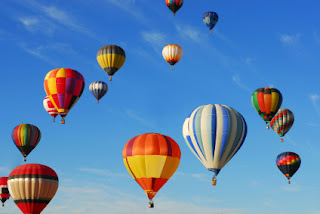 |
| Hot air balloons |
This assignment is the same as the raintree. I had to choose my own images and make one object colored and the rest sepia or gray toned. I used the same technique for each photo. First I used the lasso or marque tool (depending on the objects shape) and traced the outline of the object. Then I clicked Ctrl-Shift-I, which out lines the whole pictures border. Next I went to Commands, Creative, then Sepia or Grayscale. Then If there are still places that have color, take the magic wand tool and click on the area, and change it to grayscale or sepia.
 |
| Basketball |
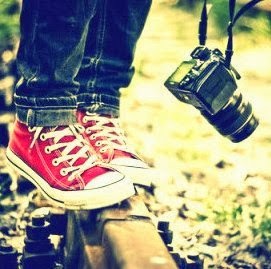 |
| Converse |
For this assignment I had to take this picture and make everything but the leaves sepia tones. So first I used the lasso tool and outlined the shape of the of the tree (minus the trunk). Then I did Ctrl-Shift-I and went to Commands, Creative, then Sepia Tones. Now everything I didn't lasso is sepia toned. Next I took the magic wand tool and changed my settings to Hard and 81. This allows me to click on the places that still have color. I continued doing this until almost all my color besides the leaves are sepia.
For this assignment I had to create my own font. I started by typing the
letters of the alphabet in capitol and lowercase letter. Each set of
letters (Aa, Bb, Cc,..etc) is in its own layer. Then I chose one set of
letters, clicked on text and chose 'convert to paths'. Then I selected
Ctrl-Shift-G to un-group the letters. Now I can individually change the
shape of each letter. I started by adding points to the sides of my
letters and made them look jaggedy. Hence the name "Jagged".
For this assignment I had to create a cornucopia for Thanksgiving. The cornucopia had to be filled with fruits and vegetables only grown in fall. So I chose pumpkin, squash, corn, carrots, tomatoes, grapes, an apple, and some flowers for decoration. We had to make this picture using layers and other features in Firework.
The background (layer 11/background):
I used the paintbrush tool and chose a splatter paint around the edges. Then I used the spiral tool and gave it a glow, and put them in the corners.
The cornucopia basket (layer 10/basket):
First I took the paintbrush tool and made the general shape of the basket. Then filled in the basket with the color I wanted, then scribbled lines to give it texture. Next, I made a circle and gave it an ellipse gradient, I positioned the circle under my basket shape to make it look empty. Then I clicked Ctrl-Shift and grabbed both objects, next I clicked Ctrl-G and that grouped my objects together to make a cornucopia.
The squash (layer 9/squash):
First I made an oval shape then used the white cursor to move the points to the shape I liked. I gave it a mesh texture and an inner bevel. I then added a stem with the rounded rectangle tool. Then I clicked Ctrl-Shift and grabbed both objects, next I clicked Ctrl-G and that grouped my objects together.
The pumpkin (layer 8/squash):
First I made 3 ovals, then I put the ovals close together, I used the white cursor to make the two outer ovals to the shape I wanted. I gave all 3 shapes an inner bevel. For the stem I did the exact same steps just with a closed spiral shape. Then I clicked Ctrl-Shift and grabbed both objects, next I clicked Ctrl-G and that grouped my objects together.
The grapes (layer 7/grapes):
First I made one small circle and gave it an inner bevel and a texture. Then I used Ctrl-Alt to duplicate it and make a bunch of circles. I used the same technique for the leaves and then clicked Ctrl-Shift and grabbed both objects, next I clicked Ctrl-G and that grouped my objects together.
The apple (layer 6/apple):
First I made and oval and duplicated it, then I put the ovals close together and and grouped them. I gave the shape an inner bevel and made a leaf which also has an inner bevel. Then I grouped the leaf with the apple shape.
The corn (layer 5/corn):
First I made one big oval and two smaller ovals. I positioned the two smaller ovals on the outside of the big one and used the white cursor to move the points of the smaller ones to fit the big oval. The bigger oval should be yellow and the small ones should be green. I gave the yellow oval a texture different from the green ones and gave them an inner bevel and grouped them together.
The carrots (layer 4/carrots):
First I made a long oval shape, then moved the points with the white cursor to the position I wanted. Next, I gave it a texture and an inner bevel and duplicated the shape. Then clicked Ctrl-Shift and grabbed both objects, next I clicked Ctrl-G and that grouped my object together.
The tomatoes (layer 3/tomatoes):
First I made a circle and moved the points a little with the white cursor. Next I used the polygon tool and changed how many points it had to make the stem. Then I gave each of them a texture and an inner bevel. Then I finally grouped them together.
The flowers (layer 2/flowers):
First I used the polygon tool and changed the points. Then I gave the flower a texture and an inner bevel, I used the circle tool to make the center and gave it an outer bevel. I grouped the center and flower together and duplicated them to make a bunch of flowers.
The final layer (layer 1/Happy Thanksgiving):
I used the letter tool to type my title, "Happy Thanksgiving". I highlighted it to choose my font.


